A couple years back I came into possession of a early 1990’s Bontrager RaceLight. Somebody had painted it up like a Privateer and rode the shit out of it, leaving nothing of value but the frame. This was to be one of my coolest conversions. The first step was to strip the components down to the frame and then go to the one man that could do the bike justice, Paul Sadoff from Rock Lobster. Now Paul is normally way to busy to do a Single Speed conversion like this, but since
  he built me a Singlespeed and he still has a soft spot for us Singlespeeders, he agreed to it, as long as I didn’t tell anyone. Well it’s been two years, so I think it’s safe to let the cat out of the bag. Further, I also wanted to chuck the old Manitou shock and make the bike rigid; Paul also agreed to build me a fork. Here I have a shot inside his workshop as he was doing the conversion work. The idea was to “shave” the unneeded stops and weld on some Surly, sub-11 dropouts. To this day I never asked him why he mounted them so low, but I figured he must have known what he was doing.
  After the welding was done and the fork was made, it was off to the Powder coater. To make sure my wife would not get all over me for spending too much money on another bike, I choose her favorite color, cobalt (or in this case electric) blue. The result was stunning. The fact that the fork was absolutely first rate and matched the bike with tube diameter and color, made it into one of the best looking conversions I have ever seen; even Paul said it was some of his best work.
The build of the bike was pretty
straightforward. The only original parts I used were the brakes, brake levers, stem and seatpost. The levers were old style rubber coated Suntour and the brakes, DiaComp cantilevers. Since  this was a Bonty, the steerer of course was 1 inch and Paul made it threadless at my request. I chose a Cane Creek S2 headset, since they are well made and still one of the lightest in existence. The original stem was 1 inch threadless and I threw on a Bonty RaceLite straight handlebar, Bonty bolt-on grips and bar ends. The cranks were some Bonty ISIS that came of a friends Gary Fisher. The wheel set used a set of Surly SS hubs I had in the parts bin, laced to Sun MACH IVs with Hutchinson Pythons.
  The seatpost was a Titec/ Bontrager carbon fiber original and the seat was a Bonty Race that came of my 1999 Privateer. It all went together with little problem and I had The ridged SingleSpeed to die for. But it needed to go on a diet. I can't remember for sure, But I think it came in at about 21 lbs; I wanted sub 20lbs, including pedals and water bottle cage. Time to spend some money.
 this was a Bonty, the steerer of course was 1 inch and Paul made it threadless at my request. I chose a Cane Creek S2 headset, since they are well made and still one of the lightest in existence. The original stem was 1 inch threadless and I threw on a Bonty RaceLite straight handlebar, Bonty bolt-on grips and bar ends. The cranks were some Bonty ISIS that came of a friends Gary Fisher. The wheel set used a set of Surly SS hubs I had in the parts bin, laced to Sun MACH IVs with Hutchinson Pythons.
  The seatpost was a Titec/ Bontrager carbon fiber original and the seat was a Bonty Race that came of my 1999 Privateer. It all went together with little problem and I had The ridged SingleSpeed to die for. But it needed to go on a diet. I can't remember for sure, But I think it came in at about 21 lbs; I wanted sub 20lbs, including pedals and water bottle cage. Time to spend some money.
Okay, now I could spend an arm and a leg on a lighter wheelset, but I'm happy with what I got and I like the traditional look; so my fir st thought was titanium. Oh Yeah! I started off with a bunch of Ti bollts, Ti QR front axle and a hollow rear axle. Now I'm not a big fan of ISIS, but the FSA Ti bottom Bracket was not too pricey. As much as I liked the original Bonty 1" theadless stem, but it was replaced by an Ebay Ibis Ti stem. The Bontrager sad
 dle is as unique as the Bontrager name, but it is heavy and I have developed a liking for classic ti Selle Italia Flites. I took a chance on a minimalist Sette (Price Point) Race-Ti. It turned out to be a good choice; also light and comfy. I didn’t understand why you would judge the weight of a bike without peddles; like they’re not necessary. The only way to deal with this was throw the big money at it; Time ATAC Titan Carbon. $$$$ I ha
 ve never been much of a weight weenie, so I pretty much had to learn as I was going; after and continued by dragging out a scale and weighing components. My original choice of handlebar was a Bontrager Crow Bar, because I am always trying to convince myself I like riser bars (I really don’t). However I weighed the darn thing and it was heavier than a flat Racelite bar and bar ends combined. Then there were the Bonty Big Al g
 rips. I checked around and found ESI foam grips; very high quality, light and comfy. . Throw in some lighter tubes, a Ti water bottle cage (not shown), a hollow rear axle and you get about 10 gms short of 20 lbs; Mission Accomplished!
 st thought was titanium. Oh Yeah! I started off with a bunch of Ti bollts, Ti QR front axle and a hollow rear axle. Now I'm not a big fan of ISIS, but the FSA Ti bottom Bracket was not too pricey. As much as I liked the original Bonty 1" theadless stem, but it was replaced by an Ebay Ibis Ti stem. The Bontrager sad
 dle is as unique as the Bontrager name, but it is heavy and I have developed a liking for classic ti Selle Italia Flites. I took a chance on a minimalist Sette (Price Point) Race-Ti. It turned out to be a good choice; also light and comfy. I didn’t understand why you would judge the weight of a bike without peddles; like they’re not necessary. The only way to deal with this was throw the big money at it; Time ATAC Titan Carbon. $$$$ I ha
 ve never been much of a weight weenie, so I pretty much had to learn as I was going; after and continued by dragging out a scale and weighing components. My original choice of handlebar was a Bontrager Crow Bar, because I am always trying to convince myself I like riser bars (I really don’t). However I weighed the darn thing and it was heavier than a flat Racelite bar and bar ends combined. Then there were the Bonty Big Al g
 rips. I checked around and found ESI foam grips; very high quality, light and comfy. . Throw in some lighter tubes, a Ti water bottle cage (not shown), a hollow rear axle and you get about 10 gms short of 20 lbs; Mission Accomplished!

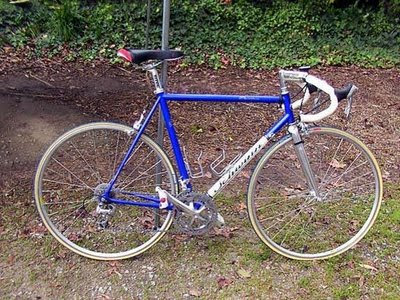
 I have no idea why I bought this bike. The only thing I can think of is that I had just rebuilt an identical frame as a fixie, but most of the bike was trashed. When I looked at this on ebay I saw I could have it for $100 and it looked to be in very good shape. When I received the bike I saw the paint had several scratches that needed some touch-up.
 How does it work? Well like the catalogue said, the chainrings are on a freewheel and the rear cogs are fixed. That way as you coast, the drivetrain keeps moving. More from the catalogue- “The FF System is the result of Shimano’s research on the problems of 10 speed gear changes. The 10-speed bicycle has gained prominence as a recreational and transformational (transformational ?) vehicle. Both young and old enjoy the convenience of multi-speeds, but many new riders have difficulty shifting correctly. Now with the FF System anyone can ride and enjoy the benefits of a multi-speed bicycle.”