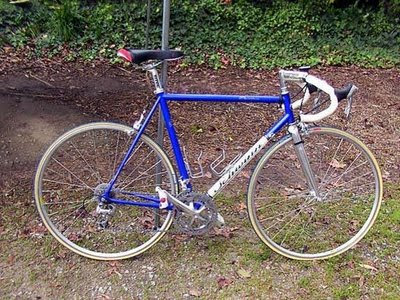
 In 1999 I bought a Schwinn Peleton. The bike is an 853 steel frame, very graceful S shaped stays, nice electric blue paint with “Schwinn” beautifully incorporated into a contrasting black on white down tube. The gruppo is almost all Shimano Ultegra except for the headset; this becomes an issue later in it’s life.
When I first bought the bike I was married to my ex-wife. The purchase of this bike was an unspoken sore spot in our relationship; added to the already mounting unspoken sore spots. Anyway, the beautiful paint started to chip off. I took it back to my LBS and they apparently had to go through 3 frames before they got a good one.
I then rode the bike for about 2 years until the single speed bug bit me and the bike sat for about 3 years. Then after I met my good friend Mike, I gave him the bike to see if his wife would become a bike spouse. Well that didn’t work and I got the bike back a couple months ago. No worse for wear, it had a Nitto stem and a new set of Conti Ultra Sports.
Now, since I parted with the Peleton my taste in geared bikes has matured. When I bought the bike I had the double crank changed to a triple. While the triple works the way it is supposed to, it is quite clunky needing two additional trim shifts to keep it quiet. Also after seeing the Nitto stem I decided it would look even better with a Nitto seat post and different seat.
 First I decided to switch to a compact crank. I think it was the designers at Campagnolo that came up with the idea of a lowered gear crank. Instead of a 52-39 double or 52-42-30 triple, they came up with a 50-34. The 52 is only useful for 28 MPH plus, with a 50-34 you get most the gearing of a triple, without the chunkiness. The compact cranks also come in the new 2-piece with exterior bearings. I decided on the 105 level R600. Once I installed the crank, I found the triple derailleur worked, but not well. I scrounged up a double 9 speed 105 derailleur and after installing it I found that although Shimano says the triple derailleur works, I wouldn’t advise it. I also got two new tools in the process.
 The OEM seatpost was a Titec and I changed the seat to a Specialized "Body Geometry" style. In 2008 this would not do. So, next I looked for a Nitto seatpost. The Peleton has a 27mm and I found that short of buying a double bolt NJS seatpost, the other Nitto posts only come in 27.2. Then as luck would have it I found a WEB Store, Peter Whit Cycles, that went to the trouble of ordering 50 Nitto Crystal seatposts so they could have them made on 27mm. SCORE! Now a seat. I
  first thought Selle Italia as I have the seat on most of my bikes. However, my wife is quite fond of the looks of Brooks saddles I have put on my last two projects. Certainly my wife will agree to fund most any seat, but if she actually likes the seat, well that’s uber cool. Anyway I found a black B-17 narrow that will do the trick.
The 1999 Peleton came with an aluminum fork. The popularity of aluminum forks was very short lived and although it looks nice, a carbon fork is certainly in order. Here I will have to admit I went uber cheap and bought a Nashbar Crabon fork, regularly $150.00, on sale for $80. When the fork came in I immedately pulled out the stem and removed the old fork. I tapped off the crown race and slipped it on the carbon fork; slipped it all the way down where it should have needed to be pressed on. The problem was obvious, the OEM fork is JIS. JIS is an older japanese standard that has been replaced with ISO, which is the now the industry standard, but is still found on some inexpensive department store bikes. After I removed the head tube cups, I found that the head tube on the frame is ISO, which means the current headset is is half ISO and half JIS, so a JIS fork will work in an ISO head tube. I have seen these 50/50 headsets for sale labeled a "30.2/27.0 headset." (30.2 for the ISO head tube cup ID; and 27.0 for the JIS crown race ID. If you then want to upgrade to an standard fork with an ISO, 26.4mm crown race, you can simply buy a compatible Tange ISO crown race (Tange sells them separately) or buy a new threaded ISO headset; I choose to do the latter. At this point I had a sudden realization of the obvious. I had wondered from the beginning why Schwinn has spec'd the cheaper Tange headset over an Ultegra headset that would have matched the spec on the rest of the bike. Well, the reason suddenly became obvious; the Ultegra would not have worked with the JIS fork. So I picked one up and now the entire bike is finally Ultegra throughout.

Do the Math
Well the Carbon fork has too short. The original steerer was 170 mm (I thought 165). But there was a 7mm spacer so I figured I was set. Not. Turns out the Ultegra headset had a 4mm higher stack height then the OEM Tioga; do the math and I'm 7mm short. So the 160 is in the mail back to Nashbar and the 175mm has been ordered in it's place....
Its about a week later and as you can see it all worked out. I even threw on the short cage rear derailleur to finish it off.


 The whole messenger/courier


